Blog

  • Preview – Plugin Monitoring through Dataverse Accelerator App

    I was exploring the Dataverse Accelerator App, and I came across this preview feature which explains about the plugin monitoring through Dataverse Accelerator App.

    Earlier in my environment I only had 2 options as below –

    Create Instant Plugins and Create Automated Plugin

    So in order to get the Plugin Monitoring option you may need to update the Dataverse Accelerator app through – https://admin.powerplatform.microsoft.com/.

    Select your environment and then Navigate to Dynamics 365 Apps.

    You may see the option as Update available besides the “Dataverse Accelerator App”. Click on it and install.

    Installation may take few minutes to complete. Once it is complete you see Plugin Monitoring option in the app as below –
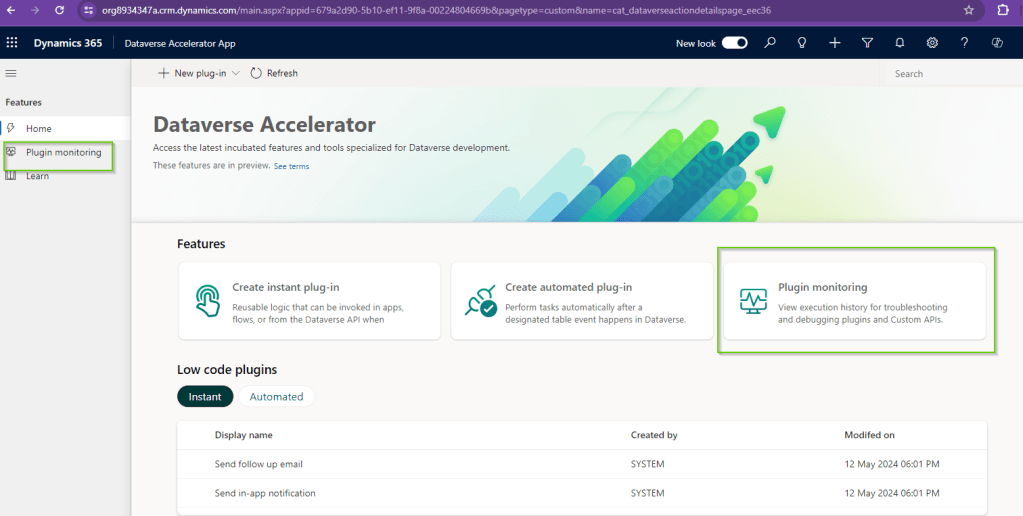
    So when you click on the Plugin Monitoring above you will see the Plugin Traces screen as below –
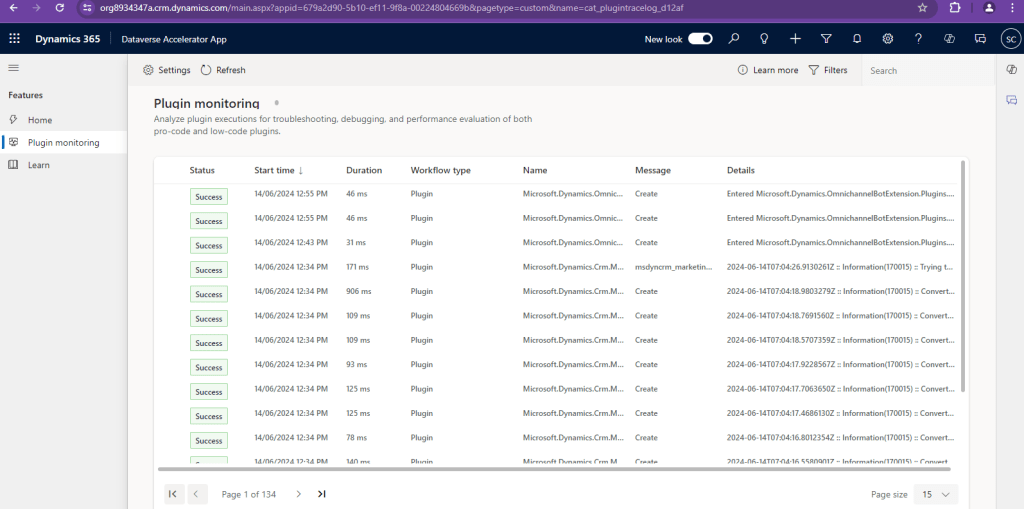
    Earlier in order to view the Plugin Traces we would either have to navigate through Settings > Plugin Trace Logs in the old UI (Web UI) or use Plugin Trace Viewer in XrmToolbox.

    But now from this latest Plugin Monitoring option in Dataverse Accelerator App we get the new modern UI look to monitor the Plugin Traces.

    Also from above if we click on the Settings Icon in Plugin Monitoring page we will get the option to enable/disable the trace logs and no need to navigate to System Settings.

    Also when we select any particular trace log record we see the information of Message body and Exception details in the right hand side pop-out as below-
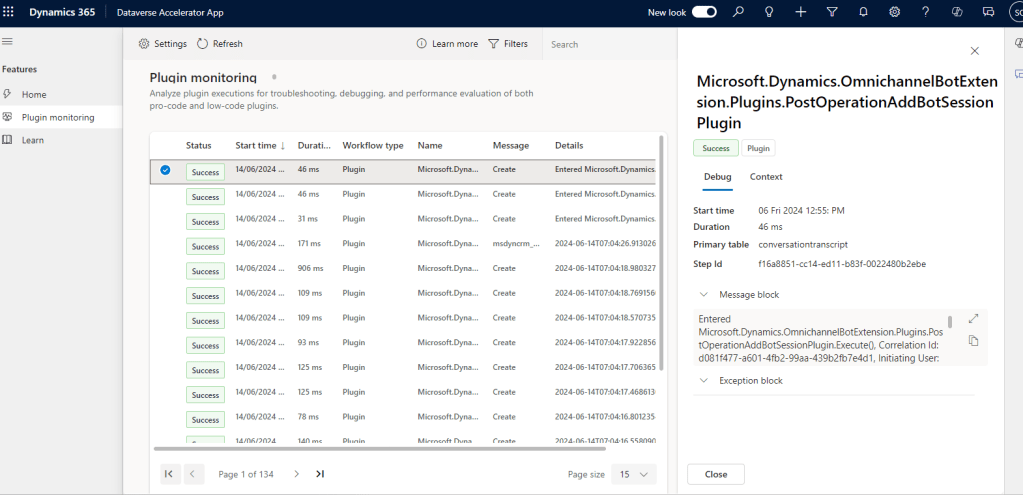
    In addition to this, we are also able to see the Status column which represents “Success” or Failure of the operation. Also we have the option to Filter the rows as below

    It becomes more handy to filter out the plugins using the available filter options.
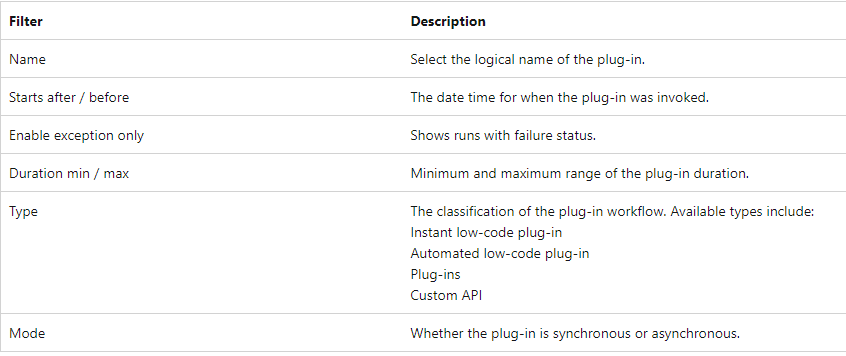
    (Image added from docs.microsoft.com)

    Using this inbuilt modern UI for monitoring the plugins it will become more handy option for Administrators to monitor the failure and verify the logs.

    As it is a preview feature, we may expect some more enhancements in the feature in coming time.

    For details like Privileges required, or any FAQ’s on this preview topic you may also follow below link –

    https://learn.microsoft.com/en-us/power-apps/maker/data-platform/dataverse-accelerator/plugin-monitoring

    Hope this becomes handy feature in coming days !!

  • Tip – Setting Default Time Zone for Real-time Journeys in Customer Insights- Journeys

    Whenever we create a new Real-time journey in Dataverse, we see the Default time zone set to “GMT Coordinate Universal Time” as below. This is the default behavior of journeys. And then when we need to run the journey in specific time zone we change the value of the time zone dropdown to specific time zone and then publish the journey.

    Have seen couple of times if we don’t change the journey time as per the selected time zone and publish the journey then we will have to wait for the corresponding GMT time to start the journey.

    So in-order to address this thing we have option to select the Default settings for the time zone by following below steps.

    Navigate to Settings > Journey Settings as below.

    You will get the below page opened, on click of Journey settings where we will get the dropdown for time zone type as below-

    So as you can see above we have 2 options here

    Option 1 – As specific timezone

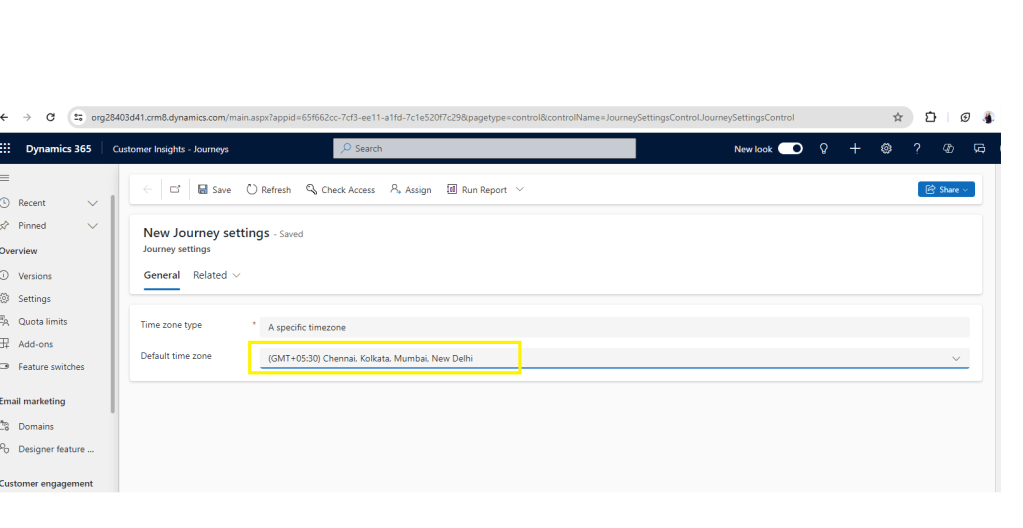
    When we select this we get the option to select a default time zone which we want to be applicable for all the journey records created after enabling this setting.

    So after selecting this option we need to select the Default timezone which we want to apply for new journeys as below-

    After enabling this setting the new journey records will populate the same time zone value as selected above.

    Option 2- The time zone of the user who creates the journey

    When we select this option the default time zone on the journey is set as per the time zone of the user creating the journey. So if you want to apply user’s time zone to the journeys created by them, we can have this setting enabled as below.

    When we enable any of the above options as per the business need, we will start seeing the changes in the default time zone set on the new journey records as below-

    Note– This setting will work for the new journey records created after enabling the settings.

    Hope this setting is useful for people like me who don’t want to manually change the time zone every time they select a new journey record.

  • Tip – Secure Input/Output Data in Power Automate Run History

    Recently one of my colleague asked me about can we hide the sensitive input/output data which we can see in the Power Automate Run History ? This made me search and get the quick response of the available option to achieve it. (which I was really surprised I was not using)

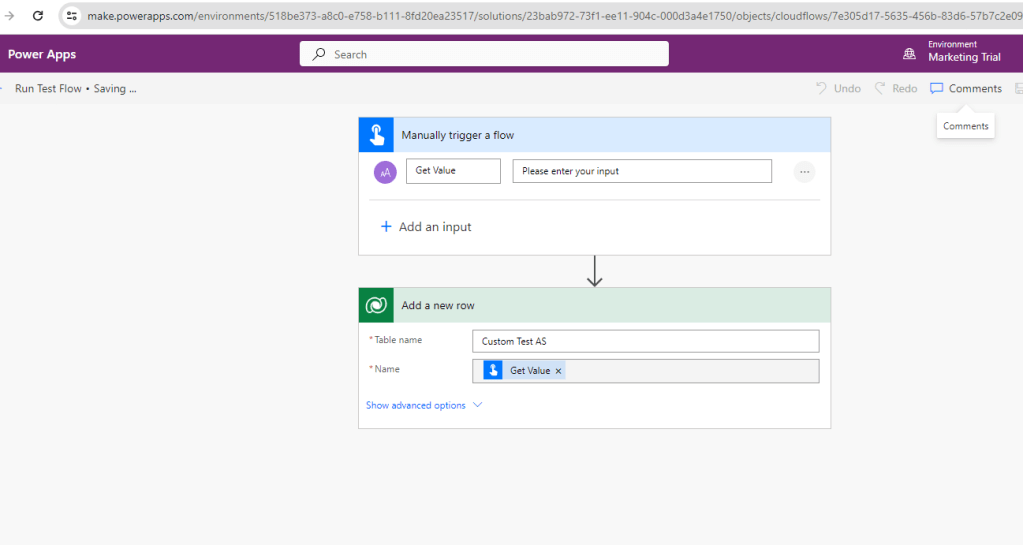
    So below is a sample Power Automate which i created to showcase this. I created a Instant flow “Run Test Flow” with Input Parameter ”Get Value” and then we will use this value to create a record in table “Custom Test A”

    Usually the flow run history of one of the sample run of above flow will look as below-

    As you can see you will be able to see the value entered in the field “Get Value” as “Value entered by sid”.

    Now we will enable the Secure Input/Output Settings for both the steps added in the above flow considering it to be sensitive information by selecting the steps and click on Settings from ellipsis as below.

    After enabling it, we will again run the flow and then open the latest run of the flow. We will see the below screen –

    So now you can see that the entered value and the contents in the steps were hidden.

    So using above setting we can hide the sensitive data which we don’t want to show in the Flow Run history.

    Note- The data is hidden only for the flow runs after the setting is enabled and not for the past runs where the setting was disabled.

    Hope this helps !!

  • Tip-Generate PDFs using Fonts through Azure Function using PDFsharp FontResolver and C#

    Recently we had a requirement to change our existing console application to Azure function. The challenging part here was to use the specific fonts which we had installed in the server machine to run the console application and generate the PDF file in desired Font Format.

    We created Azure Function of Timer type to run every 10 minutes and copy the supported code in Azure function. Problem was how to reference the specific Fonts in Azure functions.

    In order to make the Fonts available in Azure function we uploaded the required Font files of “.ttf” type as you in the Azure Blob container named “sidcon1” as shown below-

    After that we created the Environment Variable “BlobConnectionString” in the Azure Function to store the connection string to get the font file as below-

    After adding that now we need to set the GlobalFontSettings.FontResolver with the FontResolver object as documented here – https://www.pdfsharp.net/wiki/FontResolver-sample.ashx?AspxAutoDetectCookieSupport=1

    So we just added below line in the code along with implementation of FontResolver class.

     var fontResolver = new FontResolver(connectionString, templateBlobContainerName);
     GlobalFontSettings.FontResolver = fontResolver;

    One most important thing here I saw was, as the code referenced the FontResolver multiple times we started getting below error in the Azure Functions –

    FontResolver – ‘Must not change font resolver after is was once used.’

    So after spending couple of hours with the error we figure our that using C# lock mechanism we could get the object set only once, so we added below code to set the GlobalFontSettings as below which ensured that FontResolver was assigned value only once.

    (In above code for testing purpose the timer trigger was set to run every 2 minutes)

    Below I will add the FontResolver class which I had created in my application to get and set the Fonts from Azure Blob containers while generating PDF

    using Azure.Storage.Blobs;
    using PdfSharp.Fonts;
    using System;
    using System.IO;
    
    namespace TrialFunctionApp
    {
        // Custom FontResolver implementation
        public class FontResolver : IFontResolver
        {
            string connectionString = string.Empty;
            string containerName = string.Empty;
            public FontResolver(string connectionstring,string containername)
            {
                connectionString = connectionstring ?? string.Empty;
                containerName = containername ?? string.Empty;
            }
            public byte[] GetFont(string faceName)
            {
                // This implementation provides Arial font. You can modify it to load your desired font.
                if (faceName.Contains("Sarabun"))
                {
                    return FontHelper.GetFont(connectionString,containerName, "Sarabun-Bold.ttf");
                }
               
                else
                {
                    return null;
                }
            }
    
            public FontResolverInfo ResolveTypeface(string familyName, bool isBold, bool isItalic)
            {
                return new FontResolverInfo(familyName,isBold,isItalic);
            }
    
    
        }
    
        // Helper class to load font data
        public static class FontHelper
        {
            public static byte[] GetFont(string connectionString, string containerName, string fontFileName)
            {
                // Create BlobServiceClient using the connection string
                BlobServiceClient blobServiceClient = new BlobServiceClient(connectionString);
    
                // Get a reference to the container
                BlobContainerClient containerClient = blobServiceClient.GetBlobContainerClient(containerName);
    
                // Get a reference to the font file blob
                BlobClient blobClient = containerClient.GetBlobClient(fontFileName);
    
                // Download the font file to a memory stream
                MemoryStream memoryStream = new MemoryStream();
                blobClient.DownloadTo(memoryStream);
    
                // Return the font data as byte array
                return memoryStream.ToArray();
            }
        }
    
    }

    The above code ensured that the Fonts were correctly referenced in the Azure functions to generate PDF file.

    The PDF generation code remains the standard code as specified by PDFsharp references as below-

    https://www.pdfsharp.net/wiki/PDFsharpSamples.ashx

    In this blog I have specifically added the Font setting part using custom FontResolver class to help others trying to meet similar requirement.

    Hope this helps !!

  • Exit RTM Journeys using Exit Criteria – Part 2 using Segments

    In the earlier blog, we have seen how we can use Custom Triggers in the exit criteria so that the customers can exit the journey in between when the trigger is activated.

    Today we will see how we can do it using Segments. In the Exit Criteria in Journey we have another option as below –

    “Exit by segments” — So once the contact gets added to the selected segment then it should exit the current Journey.- this is the expected behavior. As we are considering the same journey flow as we had in part 1 so I will directly jump into the Segment creation part which we will select in the Exit criteria.

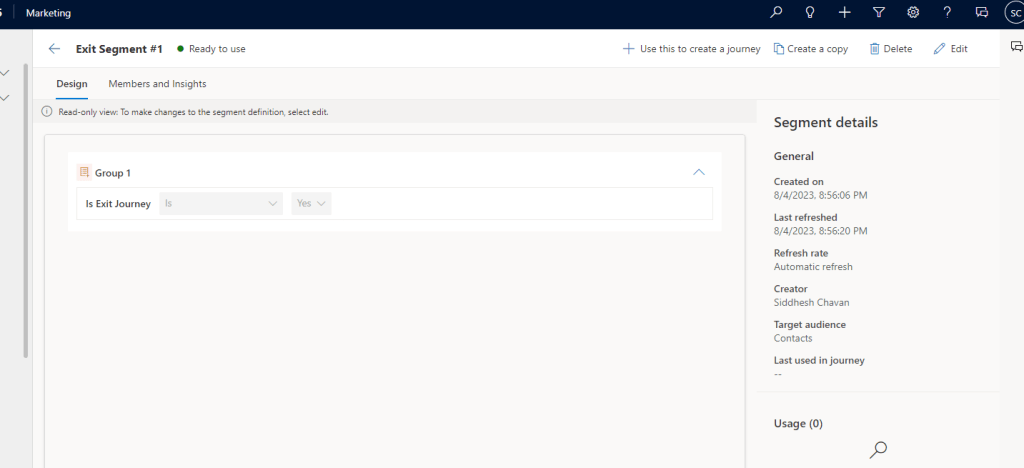
    Exit Segment #1–

    As per this, the contacts will get added in this Segment when Is Exit Journey = Yes.

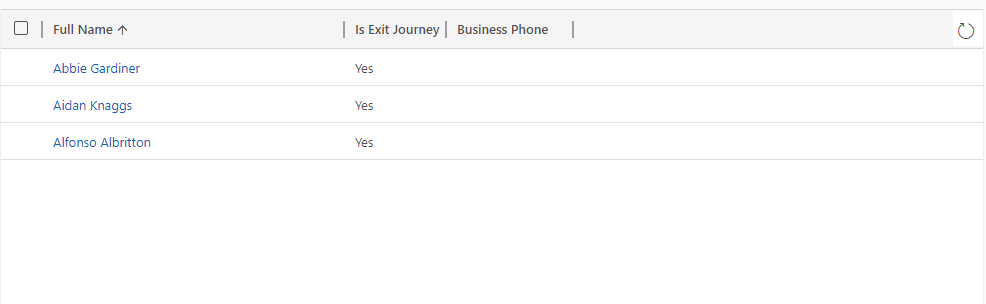
    So first in our journey the Contacts will flow till it encounters the 15 min wait time, then we will update the Is Exit Journey column of 3 contacts as Yes as below –

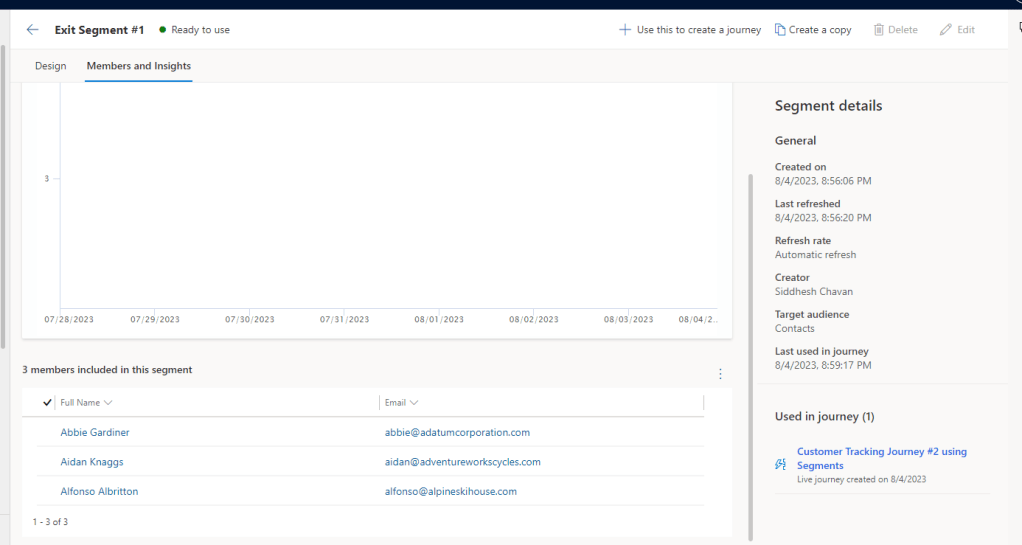
    Now the 3 contacts will be added in the segment “Exit Segment#1” as you can see below-

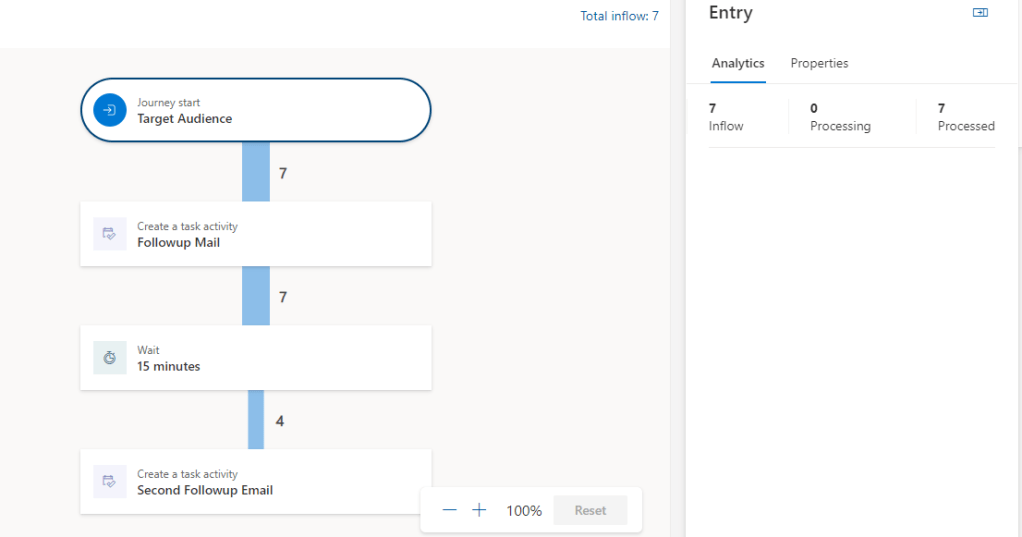
    Now in our Journey after execution of wait block it will look like below-

    4 contacts will move ahead and 3 contacts are exited as it gets added to the “Exit Segment #1” segment.

    In this way we can make use of Segments to exit from the Journeys based on respective segments.

    Hope this helps!

    Happy D365 Marketing!!