Blog

  • PCF Control Development Explained: A Visual Roadmap for Dynamics 365 Developers

    PCF Control Development Explained: A Visual Roadmap for Dynamics 365 Developers

    A numeric textbox works, but a slider may make a score easier to understand. A list of records works, but a card layout may help users find the next action faster. These are the kinds of user experience problems that Power Apps Component Framework (PCF) can help developers solve.

    This guide explains PCF control development through a mind map and a practical roadmap, with Dynamics 365 and model-driven Power Apps developers in mind.

    What is PCF?

    PCF lets developers build reusable code components for Power Apps. A component combines a manifest, TypeScript implementation, and resources such as CSS and localization files. Components can be packaged in Dataverse solutions and configured in apps.

    For a C# developer, a useful analogy is a small UI component with a defined contract: the host supplies inputs, your component renders an experience, and it returns outputs when the user changes something. The implementation runs in the client, so keep authoritative business validation in the appropriate server or platform layer.

    The PCF development mind map
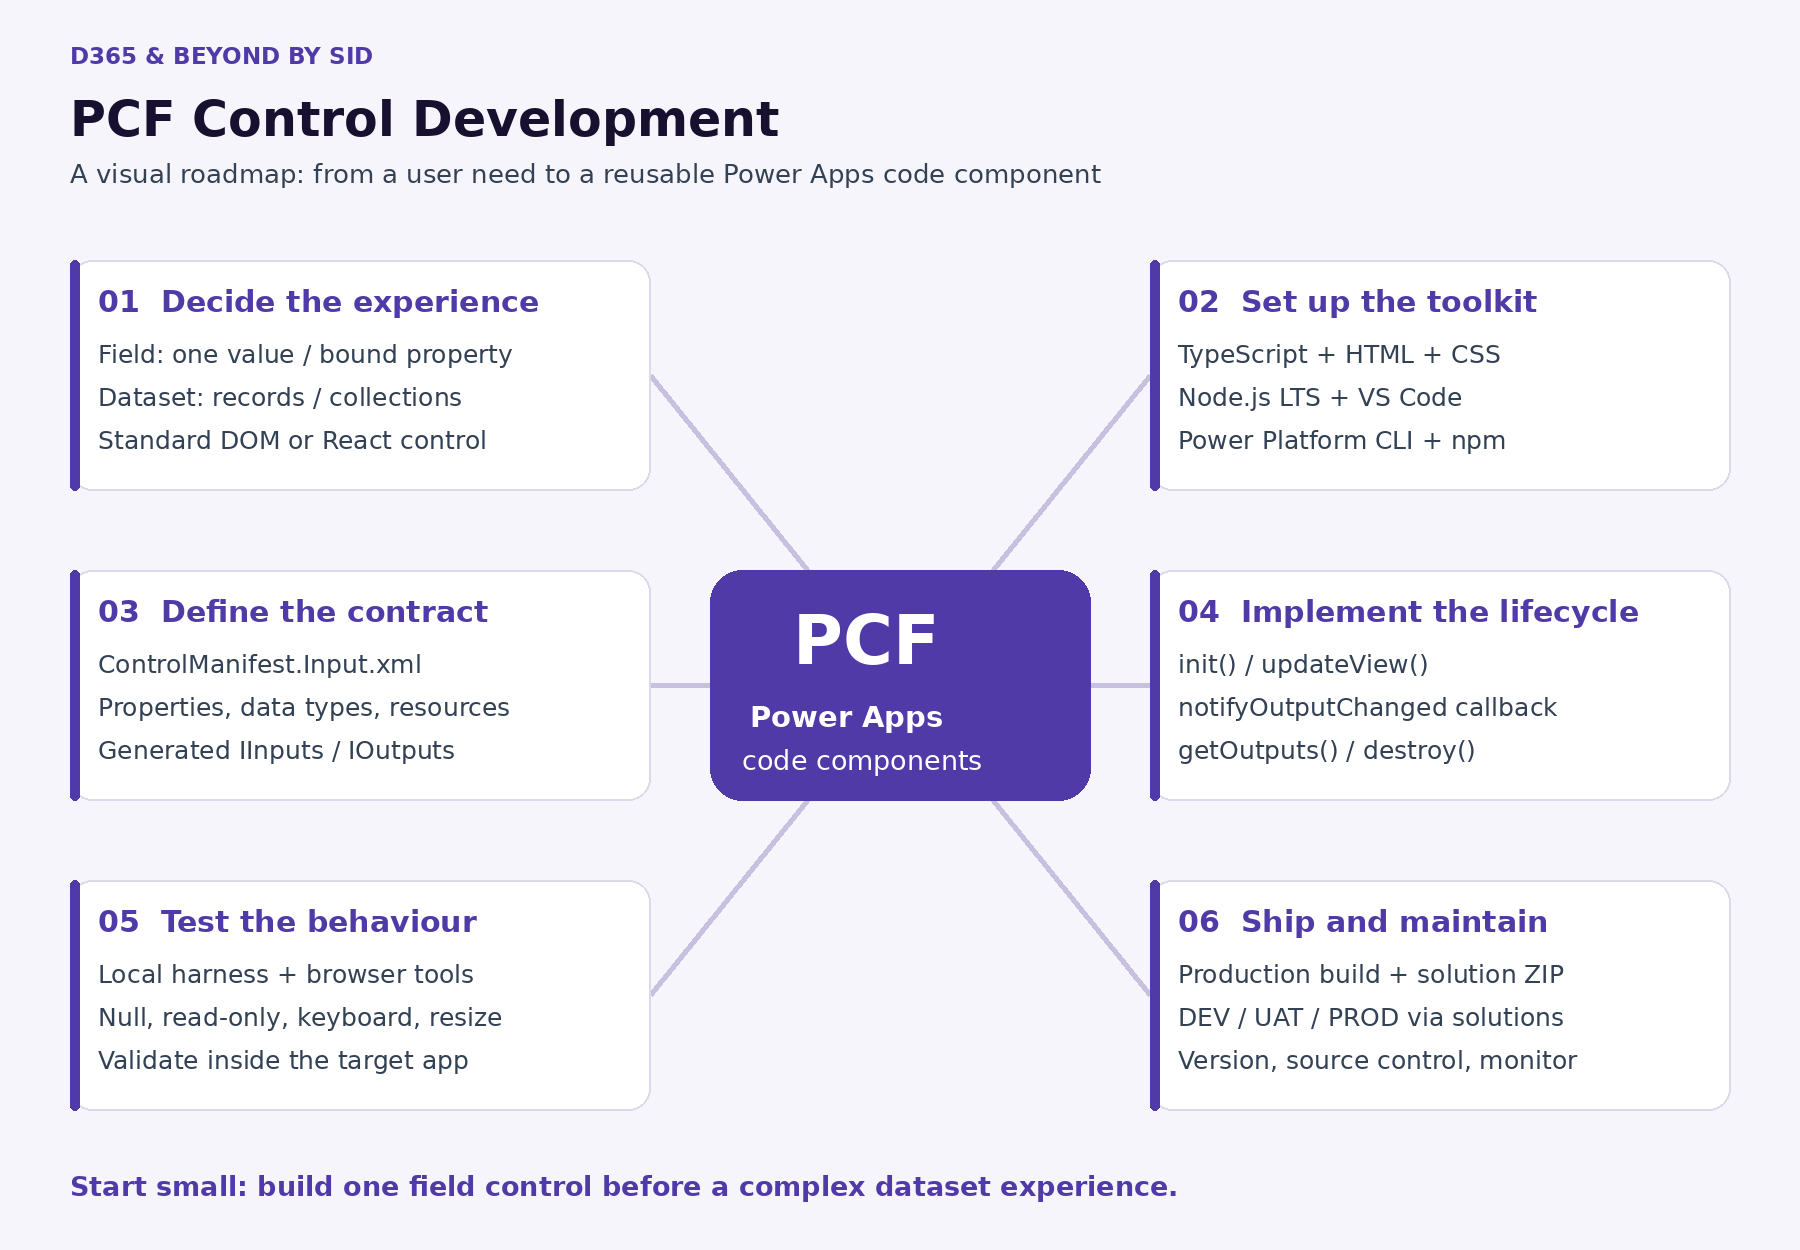
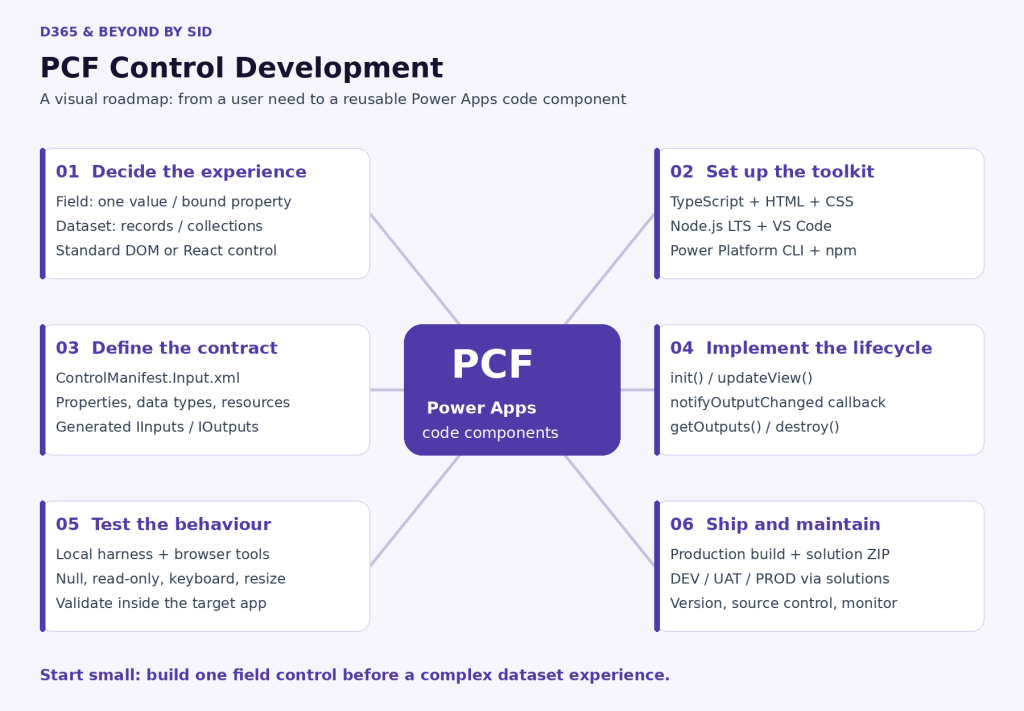
    PCF development mind map covering control types, tooling, manifest, lifecycle, testing and solution deployment.
    PCF control development roadmap. Select the image to view it at full size.

    Read the map as six decisions: define the experience, prepare the tools, describe the contract, implement behaviour, test in context, and release through solutions. Coding is only one part of that journey.

    1. Choose the right control for the problem

    ChoiceTypical useExample
    Field componentAn experience centred on a column valueA satisfaction score rendered as a slider
    Dataset componentAn experience over a collection of recordsA card list for open service requests
    Standard controlYour code creates and manages its DOM within the supplied containerA lightweight HTML input
    React controlUse the React template and platform libraries; updateView returns a React elementA reusable React-based UI

    Field versus dataset describes the data shape. Standard versus React describes the implementation approach. These are separate decisions.

    Start by checking whether an existing Power Apps control already meets the need. A custom component is most useful when the improvement is clear enough to justify development, testing, and ongoing support.

    2. Set up a first component

    Install Visual Studio Code, a supported Node.js LTS version, and the Microsoft Power Platform CLI. For solution packaging, also prepare the .NET SDK or suitable MSBuild tooling described in Microsoft’s tutorial.

    The following commands scaffold a standard field component. They do not implement a finished rating control: you still need to define its property, UI, and behaviour.

    mkdir RatingControl
    cd RatingControl
    pac pcf init --namespace Sid.PCF --name RatingControl --template field --run-npm-install
    code .
    npm run build
    npm start

    For a React component, create a separate project using the same initialization command with --framework react. Use the generated React interface and manifest; changing only the manifest’s control type does not convert a standard control into a React control.

    3. Treat the manifest as the component contract

    ControlManifest.Input.xml defines the component identity, version, configurable properties, and resource files. Choose the property’s data type to match its intended binding.

    For a whole-number score, the property could be declared as follows inside the control element:

    <property name="rating"
      display-name-key="Rating"
      description-key="Customer satisfaction score"
      of-type="Whole.None"
      usage="bound"
      required="true" />

    After changing the manifest, regenerate the types using npm run refreshTypes. Use the generated IInputs and IOutputs rather than manually editing generated files. Your implementation and returned output names must agree with the manifest.

    4. Understand the lifecycle and data exchange
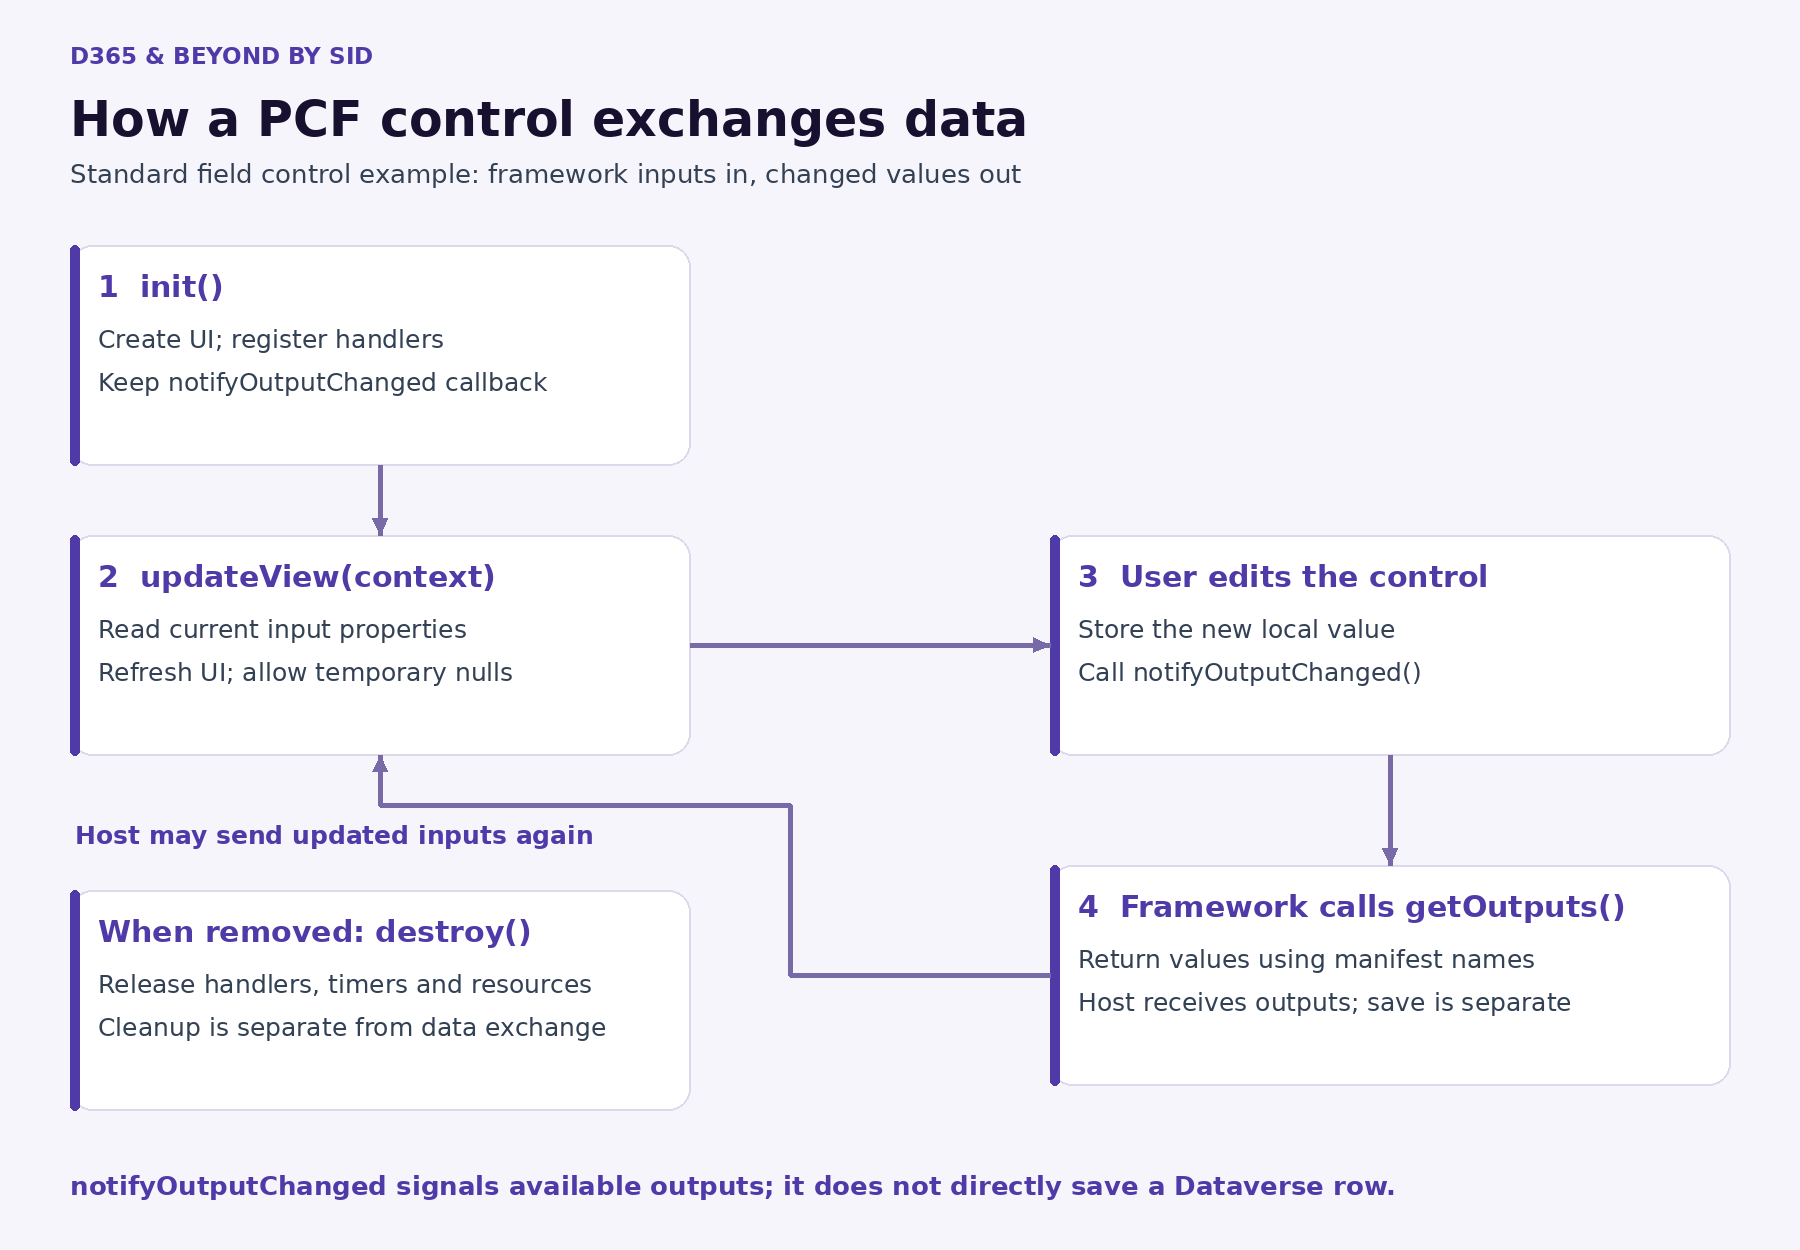
    Standard PCF field control flow: init, updateView, user interaction, notifyOutputChanged, getOutputs and destroy.
    A standard field control’s lifecycle and data exchange. Saving the record is a separate host operation.
    Method or callbackResponsibility
    init()Prepare component resources and keep the output-change callback
    updateView(context)Reflect current inputs and host state in the UI
    notifyOutputChanged()Tell the framework that changed outputs are available
    getOutputs()Return outputs using the property names in the manifest
    destroy()Release resources when the component is removed

    For the rating example, the event handler stores the selected score and calls the callback. The framework then retrieves the output. Here is an illustrative fragment, not a complete control:

    private ratingValue = 0;
    private notifyChanged!: () => void;
    
    // Assign this.notifyChanged = notifyOutputChanged inside init().
    private onRatingChanged(value: number): void {
        this.ratingValue = value;
        this.notifyChanged();
    }
    
    public getOutputs(): IOutputs {
        return { rating: this.ratingValue };
    }

    Passing an output to the host is separate from persisting a Dataverse record. Do not treat this callback as a save operation. Also allow for repeated updateView calls and temporarily unavailable input data.

    5. Test more than the happy path

    Use npm start to open the local test harness and inspect behaviour with browser developer tools. The harness is useful for quick iteration, but it does not reproduce every host capability. Test the component in the actual target app before treating it as ready.

    • Empty and null values: what should the user see before data arrives?
    • Read-only mode: can the user still change a disabled field?
    • Keyboard access: can users reach and operate every interactive element?
    • Resizing: does the layout remain usable on narrower screens?
    • Multiple instances: do event handlers, element IDs, and styles stay isolated?
    • Record changes and navigation: does the component display current data and clean up correctly?

    A simple acceptance test for the rating control is: load an existing score, change it, save the form, reload the record, and confirm the stored value and displayed value agree.

    6. Deploy with an environment strategy

    For a quick development iteration, authenticate to a development environment, verify the connection, and push from the component project folder. Replace the example environment URL with your own.

    pac auth create --url https://your-dev-org.crm.dynamics.com
    pac org who
    pac pcf push --publisher-prefix sid

    For controlled releases, package the component in a solution instead. The following example creates a solution project beneath the component project, adds the parent project reference, and builds a release package:

    mkdir Solutions
    cd Solutions
    pac solution init --publisher-name SidSolutions --publisher-prefix sid
    pac solution add-reference --path ..
    dotnet build --configuration Release

    Use publisher details appropriate to your environment. Confirm the solution project’s package type, import the generated ZIP into the target environment, configure the component in the app, and publish the relevant app customizations. Promote validated versions through DEV, UAT, and PROD using your solution process.

    For a standalone production component build, use npm run build -- --buildMode production. Keep source, manifest versions, and release notes together so a later fix can be traced to the deployed component.

    Practical mistakes to avoid

    • Using formContext or changing the host app DOM from inside the component. Keep interactions within supported PCF APIs and the component boundary.
    • Calling notifyOutputChanged on every unnecessary UI event, or repeatedly refreshing datasets without a reason.
    • Assuming every API works in every host. Microsoft currently documents that Dataverse-dependent APIs, including the PCF WebAPI, are unavailable in canvas apps.
    • Putting credentials in client-side code, or using localStorage and sessionStorage to hold component data.
    • Deploying a development bundle and postponing accessibility or cleanup work until after release.

    A small first project to practise

    Build a satisfaction score component for a whole-number column with a defined range, such as 1–5. Decide how blank values should look, provide an accessible input, return the changed score, and honour read-only mode. Then test it on a model-driven form and package it in a solution.

    Once that works reliably, add configurable labels or styling. Move to a dataset component only when you have a real requirement involving collections, paging, filtering, or record actions.

    Microsoft Learn references

    Technical references checked on 3 October 2026. The diagrams are explanatory illustrations; the code fragments are learning examples.
  • Solution-Aware Bulk Deletion Jobs in Dataverse – A Better Way to Manage Data Lifecycle with ALM

    Solution-Aware Bulk Deletion Jobs in Dataverse – A Better Way to Manage Data Lifecycle with ALM

    Bulk deletion in Microsoft Dataverse has traditionally been treated as an environment-level administrative task. With solution-aware bulk deletion jobs, Microsoft is making data lifecycle configuration much easier to manage through standard Application Lifecycle Management (ALM) practices.

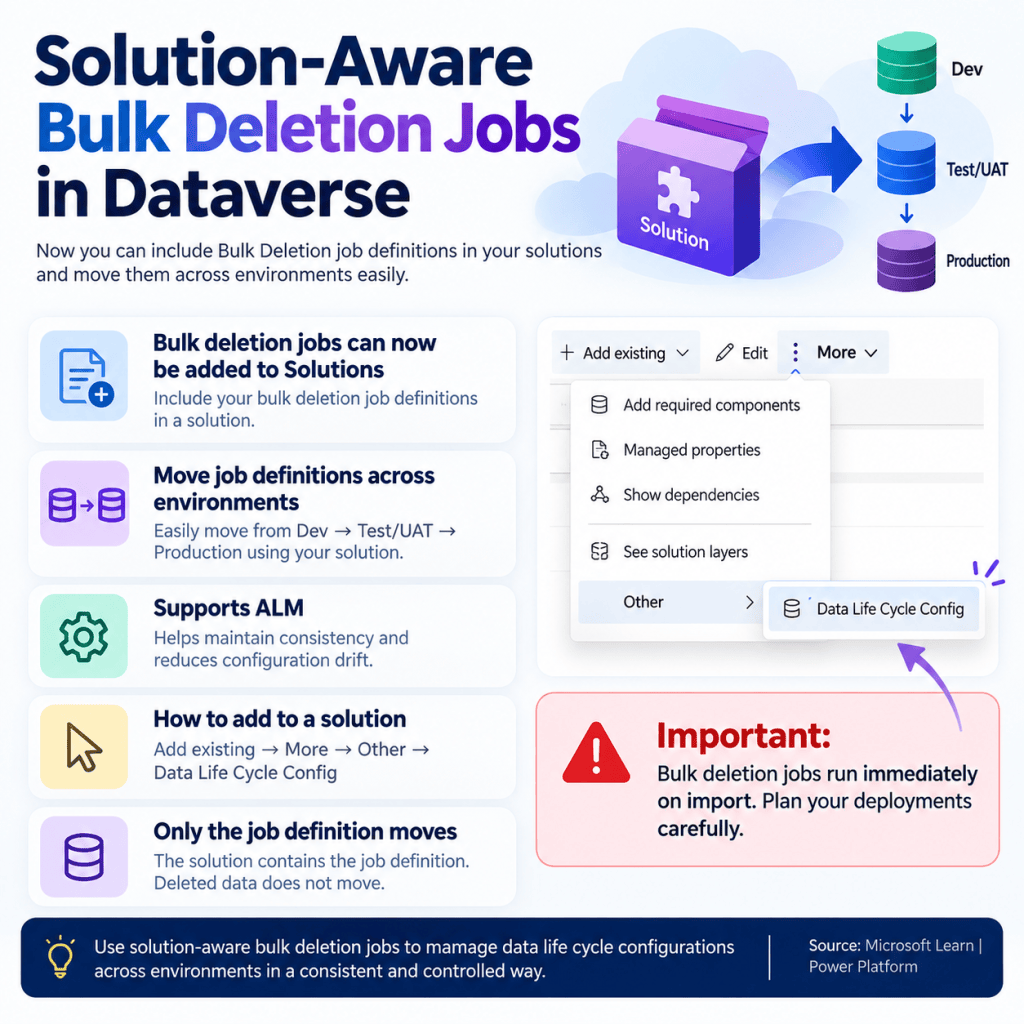
    Infographic explaining solution-aware bulk deletion jobs in Microsoft Dataverse, including ALM movement from Dev to Test/UAT to Production and import considerations.

    What are solution-aware bulk deletion jobs?

    Dataverse bulk deletion jobs allow administrators to remove records that match defined criteria. The important improvement is that a bulk deletion job definition can now be included as part of a solution.

    This means the configuration no longer needs to be recreated manually in every environment. You can define the job, add it to a solution, and move that configuration through your ALM path such as Development → Test/UAT → Production.

    Why is this useful?

    For teams managing multiple Dataverse environments, this provides a much cleaner deployment model. Instead of manually configuring equivalent cleanup jobs in each environment, the job definition becomes part of the solution deployment process.

    • Improves consistency across environments.
    • Reduces manual configuration after deployments.
    • Helps prevent configuration drift between Dev, UAT and Production.
    • Allows data lifecycle configurations to follow established ALM practices.
    • Makes environment setup and repeatable deployments easier to manage.

    How do you add a bulk deletion job to a solution?

    From your solution, use the option to add an existing component and navigate to the Data Life Cycle Config component. The bulk deletion job definition can then be included in the solution and transported to another environment.

    A simple way to think about the process is:

    Configure → Add to Solution → Export → Import → Execute in the target environment

    Important: understand what actually moves

    The solution contains the bulk deletion job definition. It does not move deleted records or data between environments. When deployed, the definition is used against the data that exists in the target Dataverse environment.

    ⚠️ Important deployment consideration

    One point deserves special attention: according to Microsoft’s documentation, bulk deletion jobs run immediately when the solution is imported.

    That makes deployment planning particularly important for Production. Before importing a solution containing a bulk deletion configuration, validate the query criteria carefully and understand exactly which records could be affected in the target environment.

    A practical ALM example

    Imagine an organization needs to periodically clean up old integration log records from Dataverse.

    1. Create and validate the bulk deletion configuration in Development.
    2. Add the configuration to your solution.
    3. Deploy the solution to Test/UAT and validate the behaviour against representative data.
    4. After validation and appropriate change controls, deploy the same solution to Production.

    This approach makes the cleanup configuration part of your deployment lifecycle rather than a separate manual administrative activity.

    Final thoughts

    This may look like a small platform improvement, but it is useful for teams that take Dataverse ALM seriously. Moving data lifecycle configurations through solutions can improve consistency, repeatability and governance across environments.

    The biggest thing to remember is the execution behaviour during solution import. Treat bulk deletion definitions with the same care as any other deployment component capable of affecting Production data.

    Microsoft documentation

    For the latest configuration details and limitations, refer to the Microsoft Learn documentation on solution-aware bulk deletion jobs.

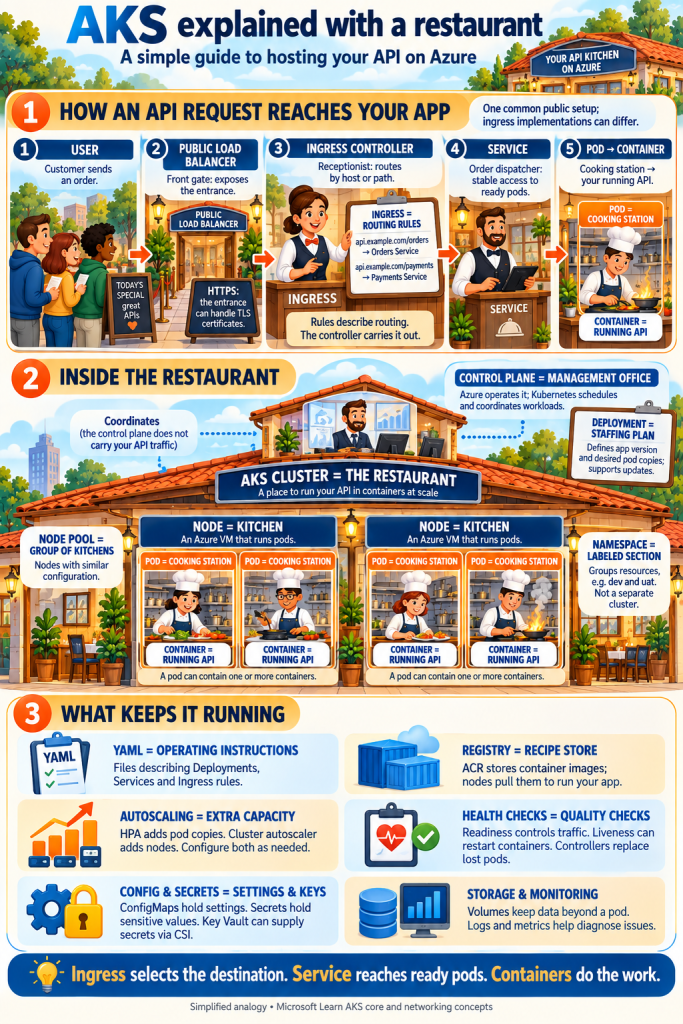
  • 🍽️ What if we explained AKS using a restaurant?

    Deploying an API using YAML files is one thing. Understanding what happens behind the scenes makes the architecture much easier to work with.

    Here’s a simple way to picture Azure Kubernetes Service:

    🏠 AKS cluster — The restaurant
    The overall setup where your applications run.

    👨‍🍳 Nodes — The kitchens
    Azure virtual machines that provide resources to run your workloads.

    🔥 Pods — The cooking stations
    Each pod contains one or more containers. Think of your API container as the chef doing the actual work.

    📋 Ingress — The reception rules
    These specify where requests should go based on the hostname or URL path.

    🙋 Ingress controller — The receptionist
    It follows those rules and routes requests to the right Service.

    🧾 Service — The order dispatcher
    It gives your application a stable access point and directs requests to ready pods.

    👔 Kubernetes — The restaurant manager
    It coordinates workloads and keeps the desired number of pod copies running.

    📈 Autoscaling — Preparing for busy hours
    When configured, pod autoscaling adds application copies, while node autoscaling adds computing capacity.

    The key distinction I wanted to highlight:

    Ingress selects the destination. Service reaches ready pods. Containers do the work.

    The infographic brings these pieces together, along with deployments, YAML, health checks, configuration and secrets.

    Which AKS concept took you the longest to understand?

  • Ditch CrmServiceClient—Embrace ServiceClient for Better Dataverse Performance!!

    Recently, we faced performance issues in our custom C# application that was using CrmServiceClient to connect to Dataverse.

    Upon investigation, we discovered that CrmServiceClient internally uses the Organization Service—i.e., the legacy OData V2 endpoint—for Create and Update operations.

    According to Microsoft’s official documentation, use of the old OData V2 endpoints is discouraged. While the documentation mainly references client-side code, the same guidance applies to server-side implementations as well.

    Microsoft recommends switching to OData V4 (Web API) even for server-side integrations. Although we initially believed that CrmServiceClient, being part of the Microsoft.Xrm.Tooling.Connector NuGet package, would abstract and handle any underlying changes automatically via DLL updates, we realized this was not the case—even when using the latest version.

    We later came across an alternative: the ServiceClient class from the Microsoft.PowerPlatform.Dataverse.Client namespace. This client supports a property called UseWebApi, which defaults to false. We explicitly set it to true, and modified our connection logic to use ServiceClient instead of CrmServiceClient.

    Upon testing (verified via Fiddler), we confirmed that Create, Update, and Execute operations were now using the OData V4 (Web API) endpoint. This allowed us to retain most of our existing codebase without rewriting it entirely for Web API usage with HttpClient.

    Based on this experience, I strongly recommend using ServiceClient for any new tools or executables that interact with Dataverse. It offers better performance, modern authentication support, and a more future-proof architecture.

    Hope this helps if you encounter a similar situation.

  • Preview -Split Audience in the Customer Journey by Percentage/Number

    In the latest update from Microsoft, a highly anticipated feature has been introduced: the ability to split the audience in a journey based on either a percentage or a specific number of customers. This enhancement is a game-changer for many clients, as it allows them to efficiently target specific customer segments within a single journey. For example, businesses can now easily offer “First 1000 Coupons” to the first 1,000 customers without needing to create multiple journeys. Previously, marketers had to rely on branching using attributes, if/then conditions, or trigger activation checks within the journey. These methods, while functional, could sometimes cause delays in processing. This new feature streamlines the process, ensuring faster and more effective campaign execution.

    To use this feature in the customer journey you need to select “Audience split(preview)” tile in the journey as below –

    Then you will get the below screen to split the audience based on percentage as below-

    As you can see, the current option to “Split audience by” only allows for selection by percentage, with no option to split by a specific number. This limitation might be due to the feature being in preview, meaning it’s still in the testing phase and not fully rolled out. It’s possible that the ability to split the audience by a specific number will be included in future updates as Microsoft continues to refine and expand this feature. Keep an eye out for upcoming releases, where this capability may become available.

    Let’s dive into the “Split Audience by Percentage” feature. With this capability, you have the flexibility to divide your audience between branches based on the percentage you specify. If you want to split the audience equally, it’s as simple as clicking the “Add branch” button and then selecting the “Equalize” option. This automatically distributes the audience evenly across the branches.

    However, if you have a specific plan in mind, you can manually adjust the percentages to match your strategy. Once your audience is divided, you can assign different activities to each branch. For instance, in my example, I’ve chosen to send 50% of the audience an email (Email 1) with one type of content, while the remaining 50% receives a different email (Email 2) with other content. This level of customization allows for more targeted and effective campaigns, tailored to different segments of your audience.

    This feature also provides valuable insights into how different segments of your audience respond to specific actions within each branch. By comparing these reactions, organizations can optimize their strategies, ultimately driving better sales performance.

    For details around the Split Audience by Number you may go through below blog –

    https://learn.microsoft.com/en-us/dynamics365/release-plan/2024wave1/customer-insights/dynamics365-customer-insights-journeys/provide-varied-experiences-one-journey-using-journey-split-tiles#feature-details

    Hope to see many such interesting features in future !!