Category: Uncategorized

  • Solution-Aware Bulk Deletion Jobs in Dataverse – A Better Way to Manage Data Lifecycle with ALM

    Solution-Aware Bulk Deletion Jobs in Dataverse – A Better Way to Manage Data Lifecycle with ALM

    Bulk deletion in Microsoft Dataverse has traditionally been treated as an environment-level administrative task. With solution-aware bulk deletion jobs, Microsoft is making data lifecycle configuration much easier to manage through standard Application Lifecycle Management (ALM) practices.
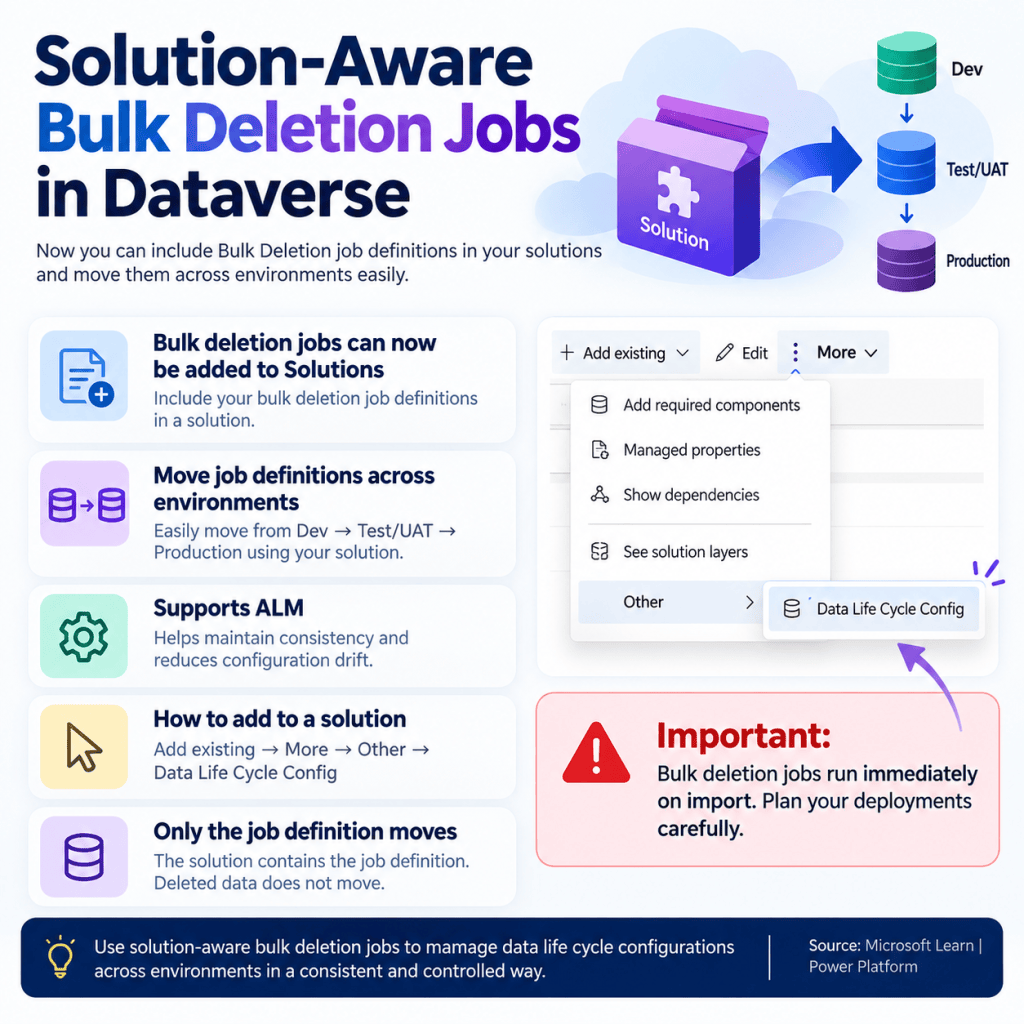
    Infographic explaining solution-aware bulk deletion jobs in Microsoft Dataverse, including ALM movement from Dev to Test/UAT to Production and import considerations.

    What are solution-aware bulk deletion jobs?

    Dataverse bulk deletion jobs allow administrators to remove records that match defined criteria. The important improvement is that a bulk deletion job definition can now be included as part of a solution.

    This means the configuration no longer needs to be recreated manually in every environment. You can define the job, add it to a solution, and move that configuration through your ALM path such as Development → Test/UAT → Production.

    Why is this useful?

    For teams managing multiple Dataverse environments, this provides a much cleaner deployment model. Instead of manually configuring equivalent cleanup jobs in each environment, the job definition becomes part of the solution deployment process.

    • Improves consistency across environments.
    • Reduces manual configuration after deployments.
    • Helps prevent configuration drift between Dev, UAT and Production.
    • Allows data lifecycle configurations to follow established ALM practices.
    • Makes environment setup and repeatable deployments easier to manage.

    How do you add a bulk deletion job to a solution?

    From your solution, use the option to add an existing component and navigate to the Data Life Cycle Config component. The bulk deletion job definition can then be included in the solution and transported to another environment.

    A simple way to think about the process is:

    Configure → Add to Solution → Export → Import → Execute in the target environment

    Important: understand what actually moves

    The solution contains the bulk deletion job definition. It does not move deleted records or data between environments. When deployed, the definition is used against the data that exists in the target Dataverse environment.

    ⚠️ Important deployment consideration

    One point deserves special attention: according to Microsoft’s documentation, bulk deletion jobs run immediately when the solution is imported.

    That makes deployment planning particularly important for Production. Before importing a solution containing a bulk deletion configuration, validate the query criteria carefully and understand exactly which records could be affected in the target environment.

    A practical ALM example

    Imagine an organization needs to periodically clean up old integration log records from Dataverse.

    1. Create and validate the bulk deletion configuration in Development.
    2. Add the configuration to your solution.
    3. Deploy the solution to Test/UAT and validate the behaviour against representative data.
    4. After validation and appropriate change controls, deploy the same solution to Production.

    This approach makes the cleanup configuration part of your deployment lifecycle rather than a separate manual administrative activity.

    Final thoughts

    This may look like a small platform improvement, but it is useful for teams that take Dataverse ALM seriously. Moving data lifecycle configurations through solutions can improve consistency, repeatability and governance across environments.

    The biggest thing to remember is the execution behaviour during solution import. Treat bulk deletion definitions with the same care as any other deployment component capable of affecting Production data.

    Microsoft documentation

    For the latest configuration details and limitations, refer to the Microsoft Learn documentation on solution-aware bulk deletion jobs.

  • Ditch CrmServiceClient—Embrace ServiceClient for Better Dataverse Performance!!

    Recently, we faced performance issues in our custom C# application that was using CrmServiceClient to connect to Dataverse.

    Upon investigation, we discovered that CrmServiceClient internally uses the Organization Service—i.e., the legacy OData V2 endpoint—for Create and Update operations.

    According to Microsoft’s official documentation, use of the old OData V2 endpoints is discouraged. While the documentation mainly references client-side code, the same guidance applies to server-side implementations as well.

    Microsoft recommends switching to OData V4 (Web API) even for server-side integrations. Although we initially believed that CrmServiceClient, being part of the Microsoft.Xrm.Tooling.Connector NuGet package, would abstract and handle any underlying changes automatically via DLL updates, we realized this was not the case—even when using the latest version.

    We later came across an alternative: the ServiceClient class from the Microsoft.PowerPlatform.Dataverse.Client namespace. This client supports a property called UseWebApi, which defaults to false. We explicitly set it to true, and modified our connection logic to use ServiceClient instead of CrmServiceClient.

    Upon testing (verified via Fiddler), we confirmed that Create, Update, and Execute operations were now using the OData V4 (Web API) endpoint. This allowed us to retain most of our existing codebase without rewriting it entirely for Web API usage with HttpClient.

    Based on this experience, I strongly recommend using ServiceClient for any new tools or executables that interact with Dataverse. It offers better performance, modern authentication support, and a more future-proof architecture.

    Hope this helps if you encounter a similar situation.

  • Preview -Split Audience in the Customer Journey by Percentage/Number

    In the latest update from Microsoft, a highly anticipated feature has been introduced: the ability to split the audience in a journey based on either a percentage or a specific number of customers. This enhancement is a game-changer for many clients, as it allows them to efficiently target specific customer segments within a single journey. For example, businesses can now easily offer “First 1000 Coupons” to the first 1,000 customers without needing to create multiple journeys. Previously, marketers had to rely on branching using attributes, if/then conditions, or trigger activation checks within the journey. These methods, while functional, could sometimes cause delays in processing. This new feature streamlines the process, ensuring faster and more effective campaign execution.

    To use this feature in the customer journey you need to select “Audience split(preview)” tile in the journey as below –

    Then you will get the below screen to split the audience based on percentage as below-

    As you can see, the current option to “Split audience by” only allows for selection by percentage, with no option to split by a specific number. This limitation might be due to the feature being in preview, meaning it’s still in the testing phase and not fully rolled out. It’s possible that the ability to split the audience by a specific number will be included in future updates as Microsoft continues to refine and expand this feature. Keep an eye out for upcoming releases, where this capability may become available.

    Let’s dive into the “Split Audience by Percentage” feature. With this capability, you have the flexibility to divide your audience between branches based on the percentage you specify. If you want to split the audience equally, it’s as simple as clicking the “Add branch” button and then selecting the “Equalize” option. This automatically distributes the audience evenly across the branches.

    However, if you have a specific plan in mind, you can manually adjust the percentages to match your strategy. Once your audience is divided, you can assign different activities to each branch. For instance, in my example, I’ve chosen to send 50% of the audience an email (Email 1) with one type of content, while the remaining 50% receives a different email (Email 2) with other content. This level of customization allows for more targeted and effective campaigns, tailored to different segments of your audience.

    This feature also provides valuable insights into how different segments of your audience respond to specific actions within each branch. By comparing these reactions, organizations can optimize their strategies, ultimately driving better sales performance.

    For details around the Split Audience by Number you may go through below blog –

    https://learn.microsoft.com/en-us/dynamics365/release-plan/2024wave1/customer-insights/dynamics365-customer-insights-journeys/provide-varied-experiences-one-journey-using-journey-split-tiles#feature-details

    Hope to see many such interesting features in future !!

  • Preview – Plugin Monitoring through Dataverse Accelerator App

    I was exploring the Dataverse Accelerator App, and I came across this preview feature which explains about the plugin monitoring through Dataverse Accelerator App.

    Earlier in my environment I only had 2 options as below –

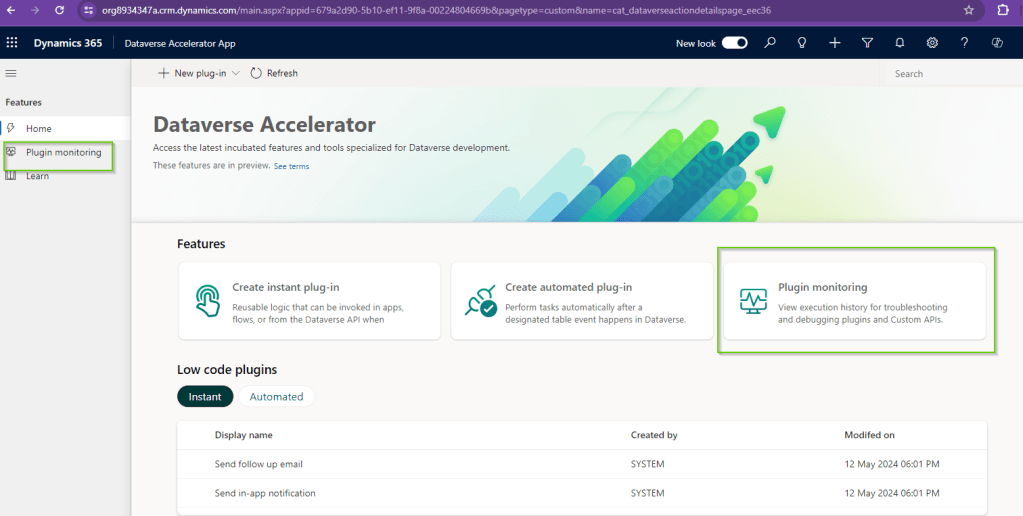
    Create Instant Plugins and Create Automated Plugin

    So in order to get the Plugin Monitoring option you may need to update the Dataverse Accelerator app through – https://admin.powerplatform.microsoft.com/.

    Select your environment and then Navigate to Dynamics 365 Apps.

    You may see the option as Update available besides the “Dataverse Accelerator App”. Click on it and install.

    Installation may take few minutes to complete. Once it is complete you see Plugin Monitoring option in the app as below –

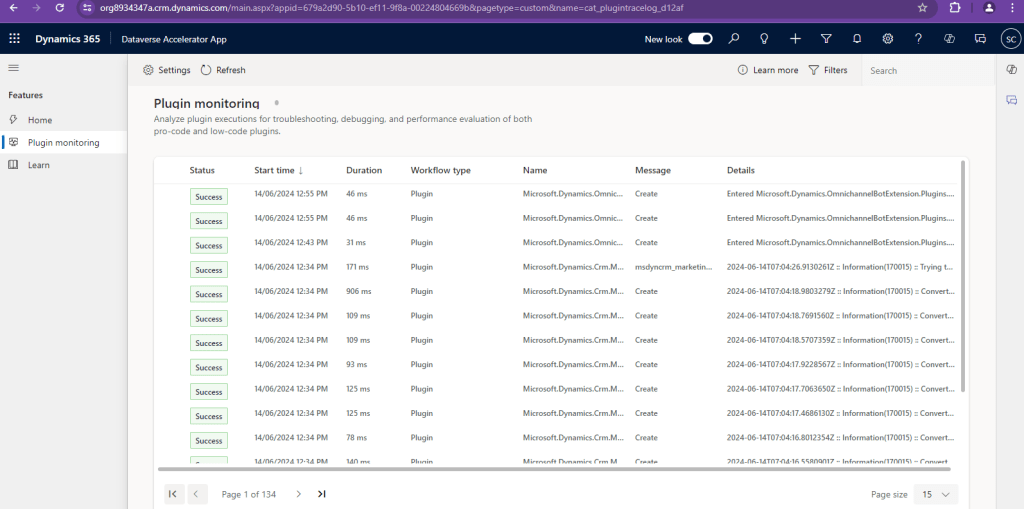
    So when you click on the Plugin Monitoring above you will see the Plugin Traces screen as below –

    Earlier in order to view the Plugin Traces we would either have to navigate through Settings > Plugin Trace Logs in the old UI (Web UI) or use Plugin Trace Viewer in XrmToolbox.

    But now from this latest Plugin Monitoring option in Dataverse Accelerator App we get the new modern UI look to monitor the Plugin Traces.

    Also from above if we click on the Settings Icon in Plugin Monitoring page we will get the option to enable/disable the trace logs and no need to navigate to System Settings.

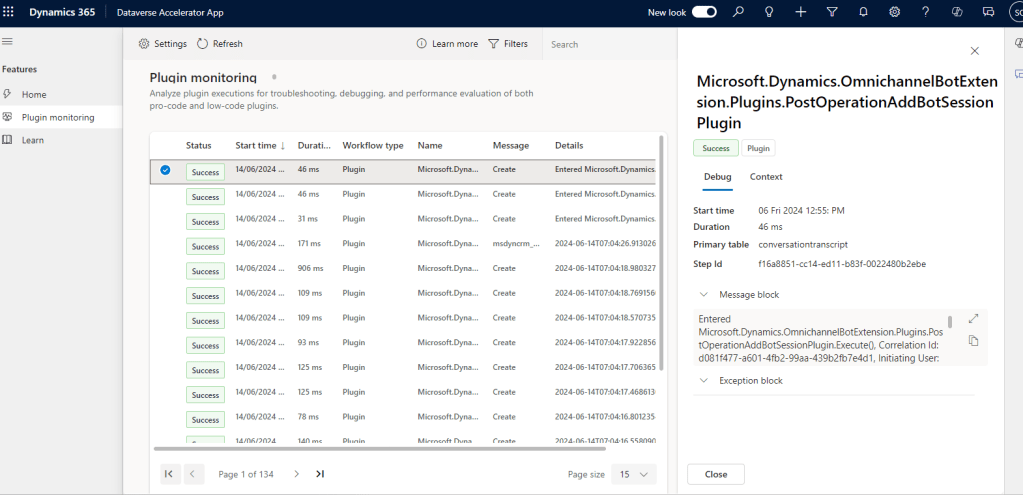
    Also when we select any particular trace log record we see the information of Message body and Exception details in the right hand side pop-out as below-

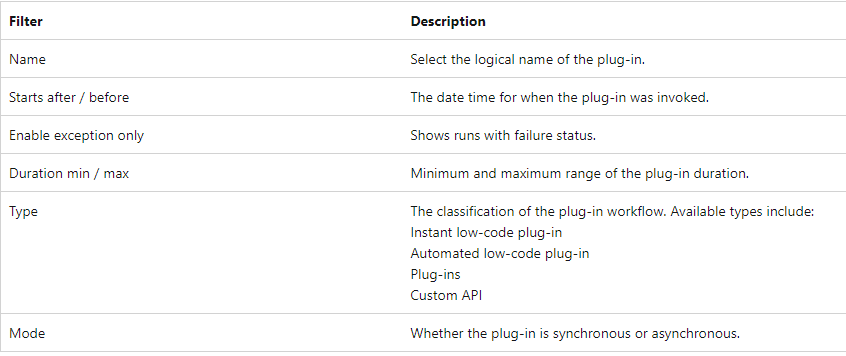
    In addition to this, we are also able to see the Status column which represents “Success” or Failure of the operation. Also we have the option to Filter the rows as below

    It becomes more handy to filter out the plugins using the available filter options.

    (Image added from docs.microsoft.com)

    Using this inbuilt modern UI for monitoring the plugins it will become more handy option for Administrators to monitor the failure and verify the logs.

    As it is a preview feature, we may expect some more enhancements in the feature in coming time.

    For details like Privileges required, or any FAQ’s on this preview topic you may also follow below link –

    https://learn.microsoft.com/en-us/power-apps/maker/data-platform/dataverse-accelerator/plugin-monitoring

    Hope this becomes handy feature in coming days !!

  • Tip – Setting Default Time Zone for Real-time Journeys in Customer Insights- Journeys

    Whenever we create a new Real-time journey in Dataverse, we see the Default time zone set to “GMT Coordinate Universal Time” as below. This is the default behavior of journeys. And then when we need to run the journey in specific time zone we change the value of the time zone dropdown to specific time zone and then publish the journey.

    Have seen couple of times if we don’t change the journey time as per the selected time zone and publish the journey then we will have to wait for the corresponding GMT time to start the journey.

    So in-order to address this thing we have option to select the Default settings for the time zone by following below steps.

    Navigate to Settings > Journey Settings as below.

    You will get the below page opened, on click of Journey settings where we will get the dropdown for time zone type as below-

    So as you can see above we have 2 options here

    Option 1 – As specific timezone

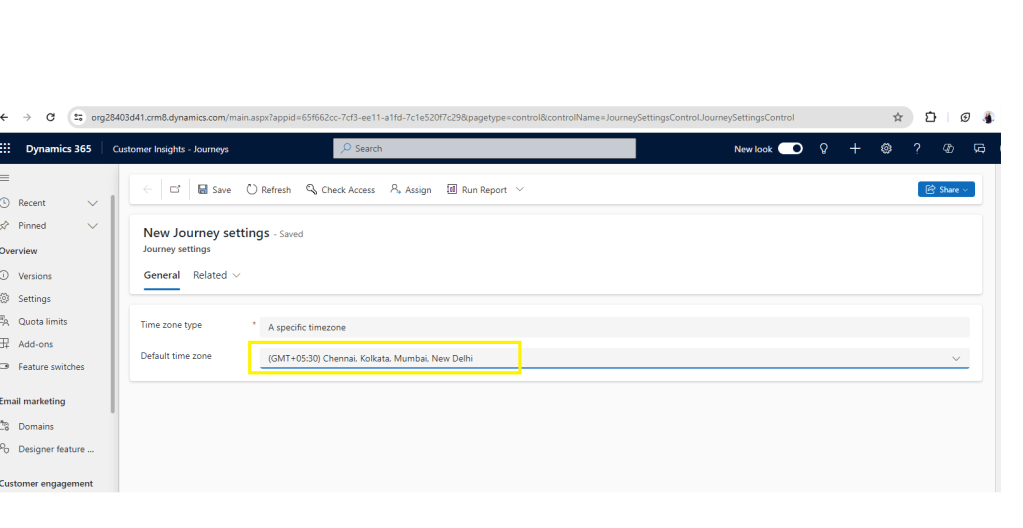
    When we select this we get the option to select a default time zone which we want to be applicable for all the journey records created after enabling this setting.

    So after selecting this option we need to select the Default timezone which we want to apply for new journeys as below-

    After enabling this setting the new journey records will populate the same time zone value as selected above.

    Option 2- The time zone of the user who creates the journey

    When we select this option the default time zone on the journey is set as per the time zone of the user creating the journey. So if you want to apply user’s time zone to the journeys created by them, we can have this setting enabled as below.

    When we enable any of the above options as per the business need, we will start seeing the changes in the default time zone set on the new journey records as below-

    Note– This setting will work for the new journey records created after enabling the settings.

    Hope this setting is useful for people like me who don’t want to manually change the time zone every time they select a new journey record.