Category: Uncategorized

  • Tip – Working with Custom Triggers, Azure Service Bus in D365 Marketing!!

    Custom Triggers in Real Time Marketing helps us to achieve different Integrations with multiple system and the contacts in D365 Marketing. There by helping to facilitate the Journeys through various channels and systems. Today I will explain here one of the use case which I recently came across.

    I had a requirement where I had to assign the available Offers(Table) to the contacts entering the Journey. And on successful assignation of Offers we had to continue the journey to send the related offers through Email.

    So here I decided to have one custom trigger “Grant Offer” to be called in Journey as below –

    And then when the custom trigger gets called pass the data to Azure Service Bus through Endpoint Integration with D365 Marketing.

    Reference for Azure Integration and registering Service End using Plugin Registration Tool- https://learn.microsoft.com/en-us/power-apps/developer/data-platform/walkthrough-configure-azure-sas-integration?view=op-9-1

    So basically as explained in the blog we had registered Plugin Step on the Service Endpoint with the message set to “msdynmkt_grantoffer_XXXXX” which is nothing but the Custom Trigger which we had created in RTM(Real Time Marketing).

    It was ok till this point, the real challenge was with the further requirement where we had to wait till the Offer records are updated with the contact lookup entering the journey. As we were sending the value of this offer record in the Email so we had added a wait condition for 5 minutes as below –
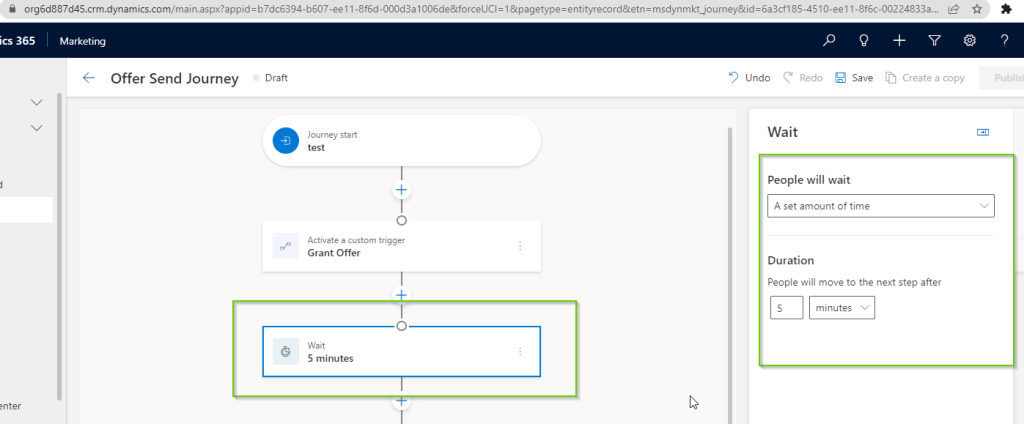
    This was ok till the count of Contacts entering the journey was less like 50-100. Actual problem started when the record count in journey increased. I mean lot of messages were posted to the queue and the processing time was more than 5 mins. So what happened is the contacts started receiving Empty Offer values in the email as the wait time of 5 minutes was completed for that particular contact and it was still not processed by the ASB (Azure Service Bus) listening application.

    Increasing the Wait Time to 1 hour or such would have caused all the contacts in the journey to wait till the specified time. So this was not efficient and expected as every contact was forced to wait for 1 hour till it completes the processing.

    After checking the available options, I found that we can use a custom trigger to achieve this. There is an option “Respond to an action” which can give us way to use another trigger as shown below –
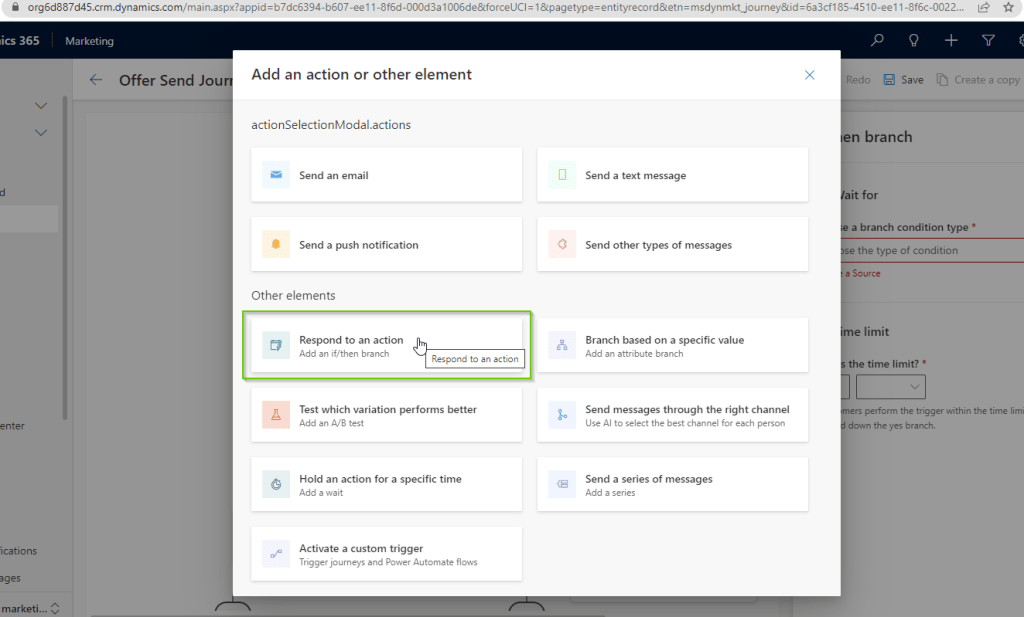
    After adding the above step we get below screen to configure the setting –

    After selecting the “A trigger is activated” option in Wait for condition and selecting the new trigger “Wait till Offer Granted”, I got the option to select the attribute “IsAssigned” which I had created as parameter for the “Wait till Offer Granted” trigger. So I configured the condition as shown below
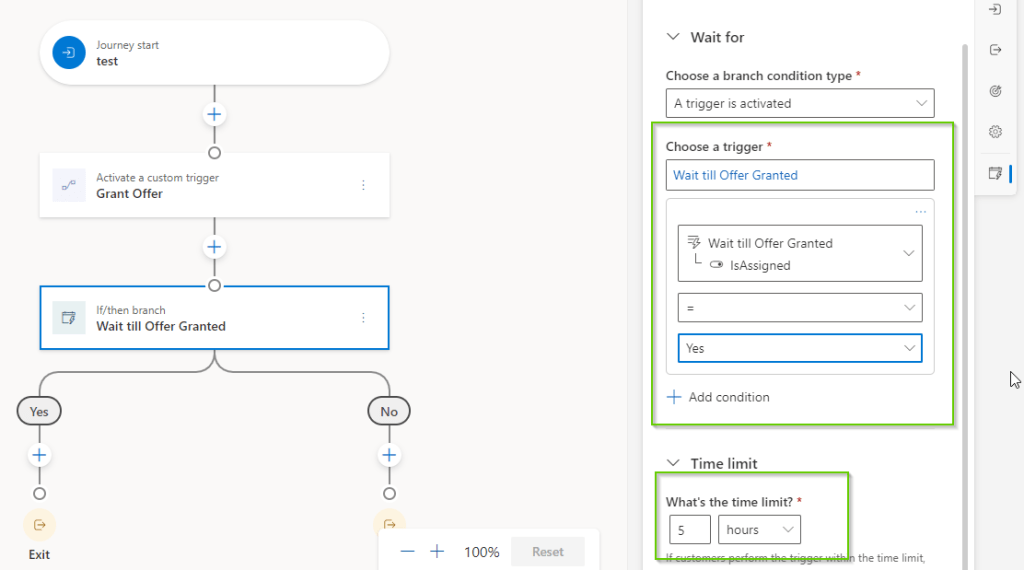
    As you can see here there is Time Limit selected as 5 hours so it means at the max it will wait till 5 hours and then it will proceed to “No” branch.

    Further, the most important change I had to add was the logic to call this new trigger “Wait till Offer Granted” from my ASB listener application, just after the Offer record was updated with contact lookup, just how we usually execute any OrganizationRequest in CRM C# application.

    Also, one more highlighting part here is the bindingid attribute which I had used while calling the wait trigger by passing the value of parent journey id i.e. of “Offer Send Journey”. This makes sure that the “Wait Till Offer Granted” trigger only activates for the related parent journey and not any other journey where the same wait trigger is used.

    And then guess what moment the trigger was called for particular contact in the journey it worked like charm! The contacts just started flowing in the Yes branch and I was able to manage my logic using another Custom Trigger. The Wait limit of 5 hours was just used to make sure my ASB listener will complete the process for the contacts flowing in the journey.

    Hope this approach helps you next time you try to incorporate WAITS in your Journeys in RTM.

    Cheers!!

  • Tip – Getting Field Length Error in Power Automate even after updating the length in Dynamics 365

    Recently we had a scenario where we were creating a new record through Power Automate step of say Entity A. We started getting error for the field length being less than the input character. So being production instance we moved the patch of the managed solution from dev to Production increasing the length of the field.

    Inspite of moving the updated length of the field we were still getting the same old length error in the Create step in Power Automate.

    We found that we had to just bring the Power Automate again from the dev instance to the Production instance.

    One more possible way can be just to edit the flow and reactivate it in the environment where it is not working.(As my issue was fixed by moving the Power Automate I was not able to try this part, but you can try this if moving power automate from dev to production is not feasible for you.)

    So next time if anyone faces such problem with the field length update in D365 not working in Power Automate even after moving the solution then you can keep the above approached in mind.

    Hope this helps and saves your time !

  • Tip – RequireNewInstance property to handle TimeOut issues while using CrmServiceClient (XrmTooling)

    Recently we had created a windows service which was running continuously on our server. The very next day we started getting Timeout exceptions for the OrganizationServiceProxy created using CrmServiceClient using XrmTooling. This was due to session getting expired after 24 hrs.

    We decided to investigate on this and came across a way to fix this. We found this attribute “RequireNewInstance” which can be passed in the connection string which did our job.

    We included the connection part in our while loop and in that we set RequireNewInstance = false while creating connection using CrmServiceClient, so that it will create new instance only when required and use the existing cached connection when the service is connected and not expired.

    Using this we were able to resolve our timeout issue as when the service gets expired it creates a fresh token and caches it, until it expires. there by not impacting the application output.

    while(true) 
    {
    //Had our logic to read the data continously from Azure Bus
    var connectObject = new CrmServiceClient($@"AuthType=ClientSecret;url={organizationUrl};ClientId={clientId};ClientSecret={appKey};RequireNewInstance=false");
    }

  • Qualify Lead Settings added in latest October Wave Release Plan

    Microsoft keeps on adding features in their every releases. Similarly now they have added an important feature which most of the clients might have asked for. And in-order to achieve it you might have done some custom development thereby increasing the effort required. So it is to option to decide what to create and what to not while Qualifying a Lead.

    Exactly now we don’t need to write a plugin to achieve this, simply set the settings and its done. I will explain it in detail below:

    Navigate to Settings >> System Settings

    Open the Sales Tab. You will find the below highlighted option:

    Lead1

    Qualify Lead experience:

    So as you can see there is an default option for create account contact and opportunity on Qualify Lead. By default it is set to YES.  In my case I have changed it to No and now I have created a new Lead and trying to Qualify it.

    On Qualify I get the below options:

    Lead2

    So now I can decide what I want to create on Qualifying a Lead. I select all the options as Yes and click OK.

    Then as i result all the 3 records got created. Now moving ahead suppose there are duplicate account or contact details and we try to Qualify the lead the we get the Duplicate warning as below:

    Lead3.jpg

    If we click continue then the new duplicate Account/Contact records will get created in System. Else if we select the suggested Account/Contact then it will be set and used while creating Opportunity.

    Note- The feature is available on both legacy Web Client and the Unified Interface.

    This feature is a real time savior and easy to configure.

    Keep configuring and do less coding !


  • Set Execution Order of Business Rules in CRM

    Recently I had been asked by an Interviewer how can we set execution order for business rule in CRM. This actually made me to do some research over to get the right answer.

    As such we don’t have any OOB ways defined to set the execution order.

    So here is my Scenario suppose I have 2 Business rules for below logic:

    1. First Business rule
      •  If  field A is greater than field 10 then set field B to 50.
    2. Second Business rule
      • If  field A is greater than field 70 then set field B to 90.

    So suppose I enter 80 in A. Then what does the field B display ?

    Obvious answer that comes in mind is the one which executes last will be displayed.

    So CRM works in FIFO here i.e. First In First Out with respect to the order in which Activation of Business rule took place.

    So suppose in the above scenario I want BR 2 to execute first and then BR1 then I have to first deactivate the BR1 and reactivate it, so that CRM internally executes BR1 after BR2.

    However its tricky to manage it in real life scenario where we need to set the execution order of Business rules. So what you can do is deactivate all the Business rules for an entity and then based on which you need to execute first,second and third and so on you reactivate it in the same order.

    Hope this info adds to you CRM knowledge.